サーバダウンから復活!!!
1年以上放置してしまいました。。。
追記 自宅でほそぼそ 古いPCを使用していましたが、
初めてVPSを借りてみました。
![]()
サーバ構築ではまったことなどをメモ、そのほか愛車のメンテ、真空管などなど毎日の独り言の記録。。

サーバダウンから復活!!!
1年以上放置してしまいました。。。
追記 自宅でほそぼそ 古いPCを使用していましたが、
初めてVPSを借りてみました。
![]()
OPENVPNを使用して、別の場所にあるサーバとVPN接続
OPENVPNはINSTALL済み
SERVER側設定済み
CLIENT側の設定のメモ
/etc/openvpn/client.confをつくる
中身↓
cipher RC2-CBC
remote hogehoge.com
proto tcp-client
dev tap
tls-client
ca /etc/openvpn/keys/ca.crt
cert /etc/openvpn/keys/cert.crt
key /etc/openvpn/keys/key.key
resolv-retry infinite
nobind
user nobody
group nobody
persist-key
pull
float
verb 3
comp-lzo
port 5000
vpn_client.shを作る
中身↓
#!/bin/sh
/usr/local/sbin/openvpn /etc/openvpn/client.conf
vpn_client.shを実行で接続。
")
caldavとは・・・ とか説明は省きます。
簡単にカレンダーを共有し、PCでもIPODでも同期できるようにしたいと
おもいつつINSTALL。
情報はdebian系 のものが多く、よくわかりませんでした。
とりあえず、自力でうごいているので、 VINE限るでメモっておきます。
とりあえず、サーバ側にpostgresはINSTALL済み。
php5-pgsqlや、 perl のYAMLははいってます。
入ってない場合は
apt-getinstall php5-pgsqltとか、
#cpan
install YAML でINSTALLしてください。
必要なRPMパッケージ 以下の3つを用意します。
 libawl-php-0.46-2.noarch.rpm
 davical-0.9.9.4-2.noarch.rpm
 perl-YAML-0.71-1vl5.noarch.rpm
はこちらのサイトから
のperl-YAMLは
INSTALLされているんですが、davicalをinstallするときに、rpmでINSTALLしていないと、
ERRORがでてしまうんので、いれてみました。
因みにVine PLUS 5のところにあったものをGET!
Ver違うからエラー出るかとおもいまいたが、 rpm -ivhでさくっと入りました。
全部INSTALLできたら、/usr/share/davical ができています。
次 su – postgres になって
cd /usr/share/davical/dba に移動
./create-database.sh で実行すると、DBとユーザが作成されます。
このときに、admin ユーザのパスワードも表示されるので、忘れずにメモ。
exit postgresユーザでの作業おわり
次 pg_hba.confの編集
以下太字の2行を追加。
# “local” is for Unix domain socket connections only
local davical davical_app trust
local davical davical_dba trust
local all all trust
postgres再起動
次 apacheの設定・・・面倒だったので、リンクを貼る
Document rootが/var/www/html だったとしたら、
cd /var/www/html で移動して。
ln -s /usr/share/davical/htdocs hoge でリンクを貼る。
http://ドメイン/hogeで画面がでれば、ひとまず成功。
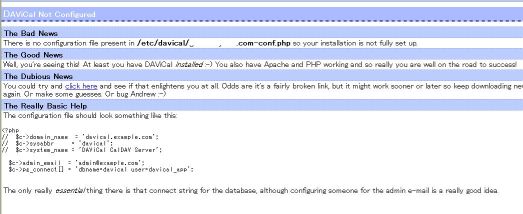
多分DAViCal Not Configured と表示がでてるので、読んでみますと、
/etc/daviacal/domein-config.php がないので、怒られてます。
なので、その通り作成し、
書く内容は
一番下に出てる。
<?php 以下
内容丸々コピーで最後に ?>
もう一度アクセスしてみると、無事ログイン画面となりました。
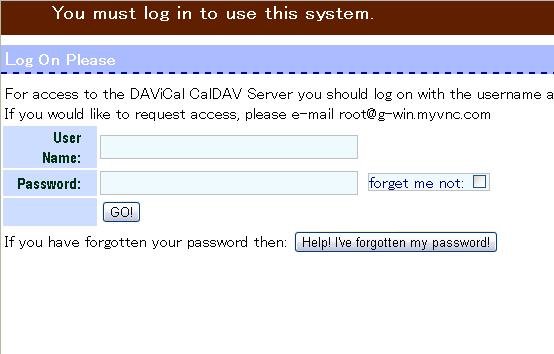
一番はじめだけ、dbインストールしたときの
ユーザ名 admin パスワード そのとき表示したもので ログインして、
すぐに変更しておきましょう
ロケールを日本にすれば、日本後のメニューになりました。

ユーザカレンダーを作っていくと、
http://ドメイン/hoge/caldav.php/ユーザ名/home/schedule
見たいなアドレスが設定されるので、
IPOD TOUCHのカレンダーに設定
DESKTOP の方は Thunderbird+アドオンのLightningで
書き込み 参照 テストは良好でした。。

mt5インストールディレクトリ/lib/MT/UtilのCaptcha.pmを編集します
sub _generate_code {
my $self = shift;
my($len) = @_;
my $code = ”;
my $genval = unpack(‘H*’, _makerandom($len*2*8/2));
# Cycle through the octets pulling off the lower 5 bits then mapped into
# our acceptable characters
foreach my $i (0..($len-1)) {
my $byte = ord(pack(‘H2’, substr($genval, $i*2, 2)));
my $x = ($byte & 31);
$code .= substr(READABLECHARS(), $byte & 31, 1);
}
return $code;
}
上記の部分の 以下のように変更します。 これで数字の2-9まででCAPTCHA表示に
変わります。
my $x = ($byte & 31);
↓↓
my $x = ($byte & 7);
$code .= substr(READABLECHARS(), $byte & 31, 1);
↓↓
$code .= substr(READABLECHARS(), $byte & 7, 1);

WEBMINのファイルマネージャを開くと、アイコンが文字化け。
少しはマシになったので メモ
ファイルの修正
apt-get 出いれてないので、自分の場合は以下のファイル。
/usr/local/src/webmin-1.470/file/lang
apt-getでINSTALLしてる場合は
/usr/libexec/webmin/file/lang あたり。。。
該当のディレクトリに移動して、ja_JP.euc ja_JP.euc.orgにリネームしてバックアップ
#mv ja_JP.euc ja_JP.euc.org
この状態でファイルマネージャを起動すると、文字化けのアイコンは
アルファベット表示になるので、初めよりはいい
次にja_JP.euc.bk を SJISに変換して ja_JP.eucを作ります。
# nkf -s ja_JP.euc.bk > ja_JP.euc
# ls ja*
ja_JP.UTF-8* ja_JP.euc* ja_JP.euc.org*
以上で何とかアイコンは日本語表示されますが、日本後ファイルの扱いはやっぱ文字化けてます。

10:MySQL-server ########################################### [ 70%]
PLEASE REMEMBER TO SET A PASSWORD FOR THE MySQL root USER !
To do so, start the server, then issue the following commands:
/usr/bin/mysqladmin -u root password ‘new-password’
/usr/bin/mysqladmin -u root -h genu password ‘new-password’
See the manual for more instructions.
NOTE: If you are upgrading from a MySQL <= 3.22.10 you should run
the /usr/bin/mysql_fix_privilege_tables. Otherwise you will not be
able to use the new GRANT command!
Please report any problems with the /usr/bin/mysqlbug script!
The latest information about MySQL is available on the web at
http://www.mysql.com
Support MySQL by buying support/licenses at http://shop.mysql.com
Starting MySQL...................................[FAILED]
# rpm -qa | grep MySQL
MySQL-devel-5.0.27-0vl6
MySQL-embedded-5.0.27-0vl6
MySQL-Max-5.0.27-0vl6
perl-DBD-MySQL-4.001-0vl1
MySQL-shared-5.0.27-0vl6
MySQL-server-5.0.27-0vl6
MySQL-client-5.0.27-0vl6
検索したらリビルトして入れなおしたら、たちあがったというかたが
ちらほらいたので、やってみる。
#cd /usr/local/src
#wget http://updates.vinelinux.org/VinePlus/4.2/SRPMS.extras/MySQL-5.0.27-0vl6.src.rpm
rpm -ivh MySQL-5.0.27-0vl6.src.rpm
# cd /usr/src/vine/SPECS/
# ls -l
合計 36
-rw-r--r-- 1 root root 34814 12月13日 2007 mysql50-vl.spec
#rpm -bb mysql50-vl.spec
かなーり 時間かかります
/usr/src/vine/RPMS/i386の中にrpmができます。
今回 serverとmaxを 入れなおして initt 6 で立ち上げなおしたら
立ち上がるようになりました。
# cd /usr/src/vine/RPMS/
[root@localhost RPMS]# ls -l
合計 24
drwxr-xr-x 2 root root 4096 12月14日 2007 athlon/
drwxr-xr-x 2 root root 4096 1月29日 20:07 i386/
drwxr-xr-x 2 root root 4096 12月14日 2007 i486/
drwxr-xr-x 2 root root 4096 12月14日 2007 i586/
drwxr-xr-x 2 root root 4096 12月14日 2007 i686/
drwxr-xr-x 2 root root 4096 12月14日 2007 noarch/
cd i386/
# ls -l
合計 50928
-rw-r--r-- 1 root root 3354230 1月29日 20:07 MySQL-Max-5.0.27-0vl6.i386.rpm
-rw-r--r-- 1 root root 6097674 1月29日 20:07 MySQL-bench-5.0.27-0vl6.i386.rpm
-rw-r--r-- 1 root root 6489432 1月29日 20:07 MySQL-client-5.0.27-0vl6.i386.rpm
-rw-r--r-- 1 root root 3667208 1月29日 20:07 MySQL-devel-5.0.27-0vl6.i386.rpm
-rw-r--r-- 1 root root 3574227 1月29日 20:07 MySQL-embedded-5.0.27-0vl6.i386.rpm
-rw-r--r-- 1 root root 2730575 1月29日 20:07 MySQL-ndb-extra-5.0.27-0vl6.i386.rpm
-rw-r--r-- 1 root root 1851642 1月29日 20:07 MySQL-ndb-management-5.0.27-0vl6.i386.rpm
-rw-r--r-- 1 root root 1622499 1月29日 20:07 MySQL-ndb-storage-5.0.27-0vl6.i386.rpm
-rw-r--r-- 1 root root 6238196 1月29日 20:07 MySQL-ndb-tools-5.0.27-0vl6.i386.rpm
-rw-r--r-- 1 root root 14841698 1月29日 20:06 MySQL-server-5.0.27-0vl6.i386.rpm
-rw-r--r-- 1 root root 1573119 1月29日 20:07 MySQL-shared-5.0.27-0vl6.i386.rpm
# mysql -u root -p
Enter password:
Welcome to the MySQL monitor. Commands end with ; or \g.
Your MySQL connection id is 220 to server version: 5.0.27-Max
Type 'help;' or '\h' for help. Type '\c' to clear the buffer.
mysql>
mysql>
mysql> SHOW VARIABLES LIKE ‘character\_set\_%’;
+————————–+——–+
| Variable_name | Value |
+————————–+——–+
| character_set_client | utf8 |
| character_set_connection | utf8 |
| character_set_database | utf8 |
| character_set_filesystem | binary |
| character_set_results | utf8 |
| character_set_server | utf8 |
| character_set_system | utf8 |
+————————–+——–+
7 rows in set (0.01 sec)
mysql>

職場の環境からだと、GWでブロックされてgmailにアクセスできないので、
外部のサーバにsquirrelmail1.5.2をインストールし、gmailのIMAPサーバに
接続できるように、設定しました。
Gmailはこちら
<準備>
gmailにアカウントをつくり、設定画面→メール転送とPOP/IMAPのタブに移動し
IMAPアクセスの項のIMAPを有効にするにチェックをいれて、保存。

赤字が設定した箇所です。
<squirrelmailのCONFIG>
SquirrelMail Configuration : Read: config.php (1.5.0)
———————————————————
Server Settings
General
——-
1. Domain : yourdomaim
2. Invert Time : false
3. Sendmail or SMTP : SMTP
A. Update IMAP Settings : imap.gmail.com:993 (other)
B. Update SMTP Settings : smtp.gmail.com:587
R Return to Main Menu
C Turn color on
S Save data
Q Quit
Command >>
<IMAP SETTING>
SquirrelMail Configuration : Read: config.php (1.5.0)
———————————————————
Server Settings
General
——-
1. Domain : yourdomaim
2. Invert Time : false
3. Sendmail or SMTP : SMTP
IMAP Settings
————–
4. IMAP Server : imap.gmail.com
5. IMAP Port : 993
6. Authentication type : login
7. Secure IMAP (TLS) : TLS
8. Server software : other
9. Delimiter : detect
B. Update SMTP Settings : smtp.gmail.com:587
H. Hide IMAP Server Settings
R Return to Main Menu
C Turn color on
S Save data
Q Quit
Command >> r
<SMTP Settings>
SquirrelMail Configuration : Read: config.php (1.5.0)
———————————————————
Server Settings
General
——-
1. Domain : yourdomain
2. Invert Time : false
3. Sendmail or SMTP : SMTP
SMTP Settings
————-
4. SMTP Server : smtp.gmail.com
5. SMTP Port : 587
6. POP before SMTP : false
7. SMTP Authentication : login (with IMAP username and password)
8. Secure SMTP (TLS) : STARTTLS
9. Header encryption key :
A. Update IMAP Settings : imap.gmail.com:993 (other)
H. Hide SMTP Settings
R Return to Main Menu
C Turn color on
S Save data
Q Quit
SquirrelMail Configuration : Read: config.php (1.5.0)
———————————————————
Folder Defaults
1. Default Folder Prefix : /
2. Show Folder Prefix Option : false
3. Trash Folder : INBOX.Trash
4. Sent Folder : INBOX.Sent
5. Drafts Folder : INBOX.Drafts
6. By default, move to trash : true
7. By default, move to sent : true
8. By default, save as draft : true
9. List Special Folders First : true
10. Show Special Folders Color : true
11. Auto Expunge : true
12. Default Sub. of INBOX : true
13. Show ‘Contain Sub.’ Option : false
14. Default Unseen Notify : 2
15. Default Unseen Type : 1
16. Auto Create Special Folders : true
17. Folder Delete Bypasses Trash : false
18. Enable /NoSelect folder fix : false
R Return to Main Menu
C Turn color on
S Save data
Q Quit
Command >> S
設定後 squirrelmailにログイン
ユーザー名とパスワードはgmailにログインするときのものです。


※不特定の人でもアクセスできてしまので、サイトにpassかけましょう。
無料でVPN環境が構築できる、OpenVPN。2.x系からはルータ越えもできるみたいです。
今回、OpenVPN 2.1_rc4で「port-share feature to allow OpenVPN and an HTTPS server to share TCP port 443.」とあったので、HTTPS 443をOpenVPNで共有しようと実験
HOST:VINE4.1
VPN:OpenVPN 2.1_rc4
server.confを以下のようにしてみる
port 443
port-share localhost 443
proto tcp
;proto udp
dev tap
link-mtu 1200
;dev tun
;dev-node MyTap
tls-server
ca ca.crt
cert server.crt
dh dh1024.pem
server 192.168.246.0 255.255.255.0
OpenVPNを再起動してみたが、起動失敗
May 11 13:33:10 openvpn[22845]: OpenVPN 2.1_rc4 i686-pc-linux-gnu [SSL] [LZO1] [EPOLL] built on May 11 2007
May 11 13:33:10 openvpn[22845]: Diffie-Hellman initialized with 1024 bit key
May 11 13:33:10 openvpn[22845]: TLS-Auth MTU parms [ L:1200 D:140 EF:40 EB:0 ET:0 EL:0 ]
May 11 13:33:10 openvpn[22845]: TCP/UDP: Socket bind failed on local address [undef]:443: Address already in useMay 11 13:33:10 openvpn[22845]: Exiting
May 11 13:33:10 openvpn.init: failed
だめじゃん・・・・・(涙
後日リベンジ
既存のパーティションの確認
root@:~# fdisk /dev/hda
The number of cylinders for this disk is set to 9726.
There is nothing wrong with that, but this is larger than 1024,
and could in certain setups cause problems with:
1) software that runs at boot time (e.g., old versions of LILO)
2) booting and partitioning software from other OSs
(e.g., DOS FDISK, OS/2 FDISK)
Command (m for help): p
Disk /dev/hda: 255 heads, 63 sectors, 9726 cylinders
Units = cylinders of 16065 * 512 bytes
Device Boot Start End Blocks Id System
/dev/hda1 * 1 33 265041 fd Linux raid autodetect
/dev/hda2 34 98 522112+ 82 Linux swap
/dev/hda3 99 162 514080 83 Linux native
/dev/hda4 163 9726 76822830 5 Extended
/dev/hda5 163 188 208813+ 83 Linux native
/dev/hda6 189 213 200781 83 Linux native
/dev/hda7 214 239 208813+ 83 Linux native
/dev/hda8 240 1544 10482381 83 Linux native
/dev/hda9 1545 1551 56196 83 Linux native
/dev/hda10 1552 2791 9960268+ 83 Linux native
/dev/hda11 2792 5402 20972826 83 Linux native
/dev/hda12 5403 8013 20972826 83 Linux native
/dev/hda13 8014 9726 13759641 83 Linux native
Command (m for help):
RAID コンフィグ作成
vi /etc/raidtab
raiddev /dev/md0
raid-level 1
persistent-superblock 1
chunk-size 4
nr-raid-disks 2
device /dev/hda1
failed-disk 0
device /dev/hdb1
raid-disk 1
raiddev /dev/md1
raid-level 1
persistent-superblock 1
chunk-size 4
nr-raid-disks 2
device /dev/hda2
failed-disk 0
device /dev/hdb2
raid-disk 1
raiddev /dev/md2
raid-level 1
persistent-superblock 1
chunk-size 4
nr-raid-disks 2
device /dev/hda3
failed-disk 0
device /dev/hdb3
raid-disk 1
raiddev /dev/md3
raid-level 1
persistent-superblock 1
chunk-size 4
nr-raid-disks 2
device /dev/hda5
failed-disk 0
device /dev/hdb5
raid-disk 1
raiddev /dev/md4
raid-level 1
persistent-superblock 1
chunk-size 4
nr-raid-disks 2
device /dev/hda6
failed-disk 0
device /dev/hdb6
raid-disk 1
raiddev /dev/md5
raid-level 1
persistent-superblock 1
chunk-size 4
nr-raid-disks 2
device /dev/hda7
failed-disk 0
device /dev/hdb7
raid-disk 1
raiddev /dev/md6
raid-level 1
persistent-superblock 1
chunk-size 4
nr-raid-disks 2
device /dev/hda8
failed-disk 0
device /dev/hdb8
raid-disk 1
raiddev /dev/md7
raid-level 1
persistent-superblock 1
chunk-size 4
nr-raid-disks 2
device /dev/hda9
failed-disk 0
device /dev/hdb9
raid-disk 1
raiddev /dev/md8
raid-level 1
persistent-superblock 1
chunk-size 4
nr-raid-disks 2
device /dev/hda10
failed-disk 0
device /dev/hdb10
raid-disk 1
raiddev /dev/md9
raid-level 1
persistent-superblock 1
chunk-size 4
nr-raid-disks 2
device /dev/hda11
failed-disk 0
device /dev/hdb11
raid-disk 1
raiddev /dev/md10
raid-level 1
persistent-superblock 1
chunk-size 4
nr-raid-disks 2
device /dev/hda12
failed-disk 0
device /dev/hdb12
raid-disk 1
raiddev /dev/md11
raid-level 1
persistent-superblock 1
chunk-size 4
nr-raid-disks 2
device /dev/hda13
failed-disk 0
device /dev/hdb13
raid-disk 1
RAIDデバイス作成
root@ :~# mkraid /dev/md0
handling MD device /dev/md0
analyzing super-block
disk 0: /dev/hda1, failed
disk 1: /dev/hdb1, 265041kB, raid superblock at 264960kB
/dev/hdb1 appears to contain an ext2 filesystem — use -f to override
mkraid: aborted, see the syslog and /proc/mdstat for potential clues.
強制的に作成
できないときにはエラーログと
本当に強制的にmkraidするオプションが表示される。
本当に強制的に作成
コマンドを入力すると・・
DESTROYING the contents of /dev/md0 in 5 seconds, Ctrl-C if unsure!
handling MD device /dev/md0
analyzing super-block
disk 0: /dev/hda1, failed
disk 1: /dev/hdb1, 265041kB, raid superblock at 264960kB
RAIDの状態
root@ :~# cat /proc/mdstat
Personalities : [linear] [raid0] [raid1] [raid5]
read_ahead 1024 sectors
md11 : active raid1 hdb13[1]
13759552 blocks [2/1] [_U]
md10 : active raid1 hdb12[1]
20972736 blocks [2/1] [_U]
md9 : active raid1 hdb11[1]
20972736 blocks [2/1] [_U]
md8 : active raid1 hdb10[1]
9960192 blocks [2/1] [_U]
md7 : active raid1 hdb9[1]
56128 blocks [2/1] [_U]
md6 : active raid1 hdb8[1]
10482304 blocks [2/1] [_U]
md5 : active raid1 hdb7[1]
208704 blocks [2/1] [_U]
md4 : active raid1 hdb6[1]
200704 blocks [2/1] [_U]
md3 : active raid1 hdb5[1]
208704 blocks [2/1] [_U]
md2 : active raid1 hdb3[1]
513984 blocks [2/1] [_U]
md0 : active raid1 hdb1[1]
264960 blocks [2/1] [_U]
md1 : active raid1 hdb2[1]
522048 blocks [2/1] [_U]
unused devices:
パーティションのIDをLINUX NATIVEからRAID AUTOに変更
Disk /dev/hdb: 255 heads, 63 sectors, 9726 cylinders
Units = cylinders of 16065 * 512 bytes
Device Boot Start End Blocks Id System
/dev/hdb1 1 33 265041 fd Linux raid autodetect
/dev/hdb2 34 98 522112+ fd Linux raid autodetect
/dev/hdb3 99 162 514080 fd Linux raid autodetect
/dev/hdb4 163 9726 76822830 5 Extended
/dev/hdb5 163 188 208813+ 83 Linux native
/dev/hdb6 189 213 200781 83 Linux native
/dev/hdb7 214 239 208813+ 83 Linux native
/dev/hdb8 240 1544 10482381 83 Linux native
/dev/hdb9 1545 1551 56196 83 Linux native
/dev/hdb10 1552 2791 9960268+ 83 Linux native
/dev/hdb11 2792 5402 20972826 83 Linux native
/dev/hdb12 5403 8013 20972826 83 Linux native
/dev/hdb13 8014 9726 13759641 83 Linux native
Command (m for help): t
Partition number (1-13): 5
Hex code (type L to list codes): fd
Changed system type of partition 5 to fd (Linux raid autodetect)
Command (m for help): t
Partition number (1-13): 6
Hex code (type L to list codes): fd
Changed system type of partition 6 to fd (Linux raid autodetect)
Command (m for help): t
Partition number (1-13): 7
Hex code (type L to list codes): fd
Changed system type of partition 7 to fd (Linux raid autodetect)
Command (m for help): t
Partition number (1-13): 8
Hex code (type L to list codes): fd
Changed system type of partition 8 to fd (Linux raid autodetect)
Command (m for help): t
Partition number (1-13): 9
Hex code (type L to list codes): fd
Changed system type of partition 9 to fd (Linux raid autodetect)
Command (m for help): t
Partition number (1-13): 10
Hex code (type L to list codes): f
You cannot change a partition into an extended one or vice versa
Delete it first.
Command (m for help): t
Partition number (1-13): 10
Hex code (type L to list codes): fd
Changed system type of partition 10 to fd (Linux raid autodetect)
Command (m for help): t
Partition number (1-13): 11
Hex code (type L to list codes): fd
Changed system type of partition 11 to fd (Linux raid autodetect)
Command (m for help): t
Partition number (1-13): 12
Hex code (type L to list codes): fd
Changed system type of partition 12 to fd (Linux raid autodetect)
Command (m for help): t
Partition number (1-13): 13
Hex code (type L to list codes): fd
Changed system type of partition 13 to fd (Linux raid autodetect)
Command (m for help):
Command (m for help): p
Disk /dev/hdb: 255 heads, 63 sectors, 9726 cylinders
Units = cylinders of 16065 * 512 bytes
Device Boot Start End Blocks Id System
/dev/hdb1 1 33 265041 fd Linux raid autodetect
/dev/hdb2 34 98 522112+ fd Linux raid autodetect
/dev/hdb3 99 162 514080 fd Linux raid autodetect
/dev/hdb4 163 9726 76822830 5 Extended
/dev/hdb5 163 188 208813+ fd Linux raid autodetect
/dev/hdb6 189 213 200781 fd Linux raid autodetect
/dev/hdb7 214 239 208813+ fd Linux raid autodetect
/dev/hdb8 240 1544 10482381 fd Linux raid autodetect
/dev/hdb9 1545 1551 56196 fd Linux raid autodetect
/dev/hdb10 1552 2791 9960268+ fd Linux raid autodetect
/dev/hdb11 2792 5402 20972826 fd Linux raid autodetect
/dev/hdb12 5403 8013 20972826 fd Linux raid autodetect
/dev/hdb13 8014 9726 13759641 fd Linux raid autodetect
Command (m for help):
Command (m for help): w
The partition table has been altered!
Calling ioctl() to re-read partition table.
Re-read table failed with error 16: Device or resource busy.
Reboot your system to ensure the partition table is updated.
WARNING: If you have created or modified any DOS 6.x
partitions, please see the fdisk manual page for additional
information.
Syncing disks.
MDデバイスのフォーマット
root@ :~# mke2fs /dev/md1から11
mke2fs 1.22, 22-Jun-2001 for EXT2 FS 0.5b, 95/08/09
warning: 304 blocks unused.
Filesystem label=
OS type: Linux
Block size=4096 (log=2)
Fragment size=4096 (log=2)
2626560 inodes, 5242880 blocks
262159 blocks (5.00%) reserved for the super user
First data block=0
160 block groups
32768 blocks per group, 32768 fragments per group
16416 inodes per group
Superblock backups stored on blocks:
32768, 98304, 163840, 229376, 294912, 819200, 884736, 1605632, 2654208,
4096000
Writing inode tables: done
Writing superblocks and filesystem accounting information: done
This filesystem will be automatically checked every 34 mounts or
180 days, whichever comes first. Use tune2fs -c or -i to override.
SWAPの作成
root@ :~# mkswap /dev/md1
Setting up swapspace version 1, size = 534573056 bytes
MDをマウントして、コピー
root@ :/mnt#
root@ :/mnt# df -h
Filesystem Size Used Avail Use% Mounted on
/dev/hda1 251M 64M 176M 27% /
/dev/hda3 486M 417M 49M 90% /opt
/dev/hda5 197M 28M 159M 15% /var
/dev/hda6 190M 15k 180M 1% /tmp
/dev/hda9 53M 5.4M 45M 11% /root
/dev/hda8 9.8G 6.8G 2.6G 72% /usr
/dev/hda13 13G 6.2G 6.2G 50% /export
/dev/hda7 197M 56M 131M 30% /www
/dev/hda11 20G 9.7G 9.0G 52% /home
/dev/hda12 20G 19G 893M 96% /ehome
/dev/md0 251M 22k 237M 1% /mnt
/dev/md2 486M 13k 460M 1% /mnt/opt
/dev/md6 9.8G 20k 9.3G 1% /mnt/usr
/dev/md7 53M 13k 50M 1% /mnt/root
/dev/md9 20G 20k 18G 1% /mnt/home
/dev/md10 20G 20k 18G 1% /mnt/ehome
/dev/md5 197M 13k 187M 1% /mnt/www
/dev/md3 197M 13k 187M 1% /mnt/var
/dev/md4 190M 13k 179M 1% /mnt/tmp
/dev/md11 13G 20k 12G 1% /mnt/export
lilo.conf、fstabの編集
root@ :/etc# cat /etc/lilo.conf
# LILO configuration file
# generated by ‘liloconfig’
#
# Start LILO global section
#boot = /dev/fd0
boot = /dev/hda1
prompt
timeout = 50
default = linux_numa
#compact # faster, but won’t work on all systems.
# delay = 5
# VESA framebuffer console @ 1024x768x64k
vga = 791
# Normal VGA console
# vga = normal
# VESA framebuffer console @ 1024x768x64k
# vga=791
# VESA framebuffer console @ 1024x768x32k
# vga=790
# VESA framebuffer console @ 1024x768x256
# vga=773
# VESA framebuffer console @ 800x600x64k
# vga=788
# VESA framebuffer console @ 800x600x32k
# vga=787
# VESA framebuffer console @ 800x600x256
# vga=771
# VESA framebuffer console @ 640x480x64k
# vga=785
# VESA framebuffer console @ 640x480x32k
# vga=784
# VESA framebuffer console @ 640x480x256
# vga=769
# ramdisk = 0 # paranoia setting
# End LILO global section
# Linux bootable partition config begins
image = /vmlinuz
root = /dev/hda1
label = linux
read-only # Non-UMSDOS filesystems should be mounted read-only for checking
# Linux bootable partition config ends
image = /boot/vmlinuz-2.4.33
root = /dev/hda1
label = linux_numa
read-only # Non-UMSDOS filesystems should be mounted read-only for checking
# Linux bootable partition config ends
image = /boot/vmlinuz-2.4.33
root = /dev/md0
label = linux_numa_RAID
read-only # Non-UMSDOS filesystems should be mounted read-only for checking
# Linux bootable partition config ends
root@ #
root@ :/etc# cat fstab
/dev/md0 / ext2 defaults 1 1
/dev/md1 swap swap defaults 1 1
/dev/md2 /opt ext2 defaults 1 1
/dev/md3 /var ext2 defaults 1 1
/dev/md4 /tmp ext2 defaults 1 1
/dev/md7 /root ext2 defaults 1 1
/dev/md6 /usr ext2 defaults 1 1
/dev/md11 /export ext2 defaults 1 1
/dev/md5 /www ext2 defaults 1 1
/dev/md9 /home ext2 defaults 1 1
/dev/md10 /ehome ext2 defaults 1 1
none /dev/pts devpts gid=5,mode=620 0 0
none /proc proc defaults 0 0
raidtab編集
root@ :/etc# cat raidtab
raiddev /dev/md0
raid-level 1
persistent-superblock 1
chunk-size 4
nr-raid-disks 2
device /dev/hda1
raid-disk 0
device /dev/hdb1
raid-disk 1
raiddev /dev/md1
raid-level 1
persistent-superblock 1
chunk-size 4
nr-raid-disks 2
device /dev/hda2
raid-disk 0
device /dev/hdb2
raid-disk 1
raiddev /dev/md2
raid-level 1
persistent-superblock 1
chunk-size 4
nr-raid-disks 2
device /dev/hda3
raid-disk 0
device /dev/hdb3
raid-disk 1
raiddev /dev/md3
raid-level 1
persistent-superblock 1
chunk-size 4
nr-raid-disks 2
device /dev/hda5
raid-disk 0
device /dev/hdb5
raid-disk 1
raiddev /dev/md4
raid-level 1
persistent-superblock 1
chunk-size 4
nr-raid-disks 2
device /dev/hda6
raid-disk 0
device /dev/hdb6
raid-disk 1
raiddev /dev/md5
raid-level 1
persistent-superblock 1
chunk-size 4
nr-raid-disks 2
device /dev/hda7
raid-disk 0
device /dev/hdb7
raid-disk 1
raiddev /dev/md6
raid-level 1
persistent-superblock 1
chunk-size 4
nr-raid-disks 2
device /dev/hda8
raid-disk 0
device /dev/hdb8
raid-disk 1
raiddev /dev/md7
raid-level 1
persistent-superblock 1
chunk-size 4
nr-raid-disks 2
device /dev/hda9
raid-disk 0
device /dev/hdb9
raid-disk 1
raiddev /dev/md8
raid-level 1
persistent-superblock 1
chunk-size 4
nr-raid-disks 2
device /dev/hda10
raid-disk 0
device /dev/hdb10
raid-disk 1
raiddev /dev/md9
raid-level 1
persistent-superblock 1
chunk-size 4
nr-raid-disks 2
device /dev/hda11
raid-disk 0
device /dev/hdb11
raid-disk 1
raiddev /dev/md10
raid-level 1
persistent-superblock 1
chunk-size 4
nr-raid-disks 2
device /dev/hda12
raid-disk 0
device /dev/hdb12
raid-disk 1
raiddev /dev/md11
raid-level 1
persistent-superblock 1
chunk-size 4
nr-raid-disks 2
device /dev/hda13
raid-disk 0
device /dev/hdb13
raid-disk 1
You have mail in /var/spool/mail/root
root@ :/etc#
raidhotaddで追加する。
root@ :/etc# raidhotadd /dev/md11 /dev/hda13
/dev/md11: can not hot-add disk: disk busy!
root@ :/etc# cat /proc/mdstat
Personalities : [linear] [raid0] [raid1] [raid5]
read_ahead 1024 sectors
md13 : active raid1 hda10[1]
9960192 blocks [2/1] [_U]
md0 : active raid1 hda1[0] hdb1[1]
264960 blocks [2/2] [UU]
md1 : active raid1 hda2[0] hdb2[1]
522048 blocks [2/2] [UU]
md2 : active raid1 hda3[2] hdb3[1]
513984 blocks [2/1] [_U]
[======>…………..] recovery = 33.8% (174272/513984) finish=3.1min speed=1796K/sec
md3 : active raid1 hda5[2] hdb5[1]
208704 blocks [2/1] [_U]
md4 : active raid1 hda6[2] hdb6[1]
200704 blocks [2/1] [_U]
md5 : active raid1 hda7[2] hdb7[1]
208704 blocks [2/1] [_U]
md6 : active raid1 hda8[2] hdb8[1]
10482304 blocks [2/1] [_U]
md7 : active raid1 hda9[2] hdb9[1]
56128 blocks [2/1] [_U]
md8 : active raid1 hdb10[1]
9960192 blocks [2/1] [_U]
md9 : active raid1 hda11[2] hdb11[1]
20972736 blocks [2/1] [_U]
md10 : active raid1 hda12[2] hdb12[1]
20972736 blocks [2/1] [_U]
md11 : active raid1 hda13[2] hdb13[1]
13759552 blocks [2/1] [_U]
unused devices:
FSTAB 書き換え (IDEからSATAorMDに変える場合)
1、ソースのDOWNLOAD
ここからtarボールをDLする。
2.ダウンロードしたファイルを適当なディレクトリにコピーし、解凍する $ tar zxvf mysql-5.0.37.tar.gz
3.解凍後、バージョンに応じたディレクトリが作成されるので、移動
cd mysql-5.0.37/
4,新規ユーザ、グループを生成
# groupadd mysql
# useradd -g mysql mysql
# passwd mysql
5.configure
$ ./configure –prefix=/usr/local/mysql –with-charset=ujis–with-extra-charsets=all–with-mysqld-user=mysql
6,インストール
#make
# make install
7.初期データベースの作成
#mysql-5.0.37/scripts/mysql_install_db
Installing all prepared tables
Fill help tables
To start mysqld at boot time you have to copy support-files/mysql.server
to the right place for your system
PLEASE REMEMBER TO SET A PASSWORD FOR THE MySQL root USER !
To do so, start the server, then issue the following commands:
/usr/local/bin/mysqladmin -u root password ‘new-password’
/usr/local/bin/mysqladmin -u root -h localhost.localdomain password ‘new-password’
See the manual for more instructions.
NOTE: If you are upgrading from a MySQL <= 3.22.10 you should run
the /usr/local/bin/mysql_fix_privilege_tables. Otherwise you will not be
able to use the new GRANT command!
You can start the MySQL daemon with:
cd /usr/local ; /usr/local/bin/mysqld_safe &
You can test the MySQL daemon with the benchmarks in the 'sql-bench' directory:
cd sql-bench ; perl run-all-tests
Please report any problems with the /usr/local/bin/mysqlbug script!
The latest information about MySQL is available on the web at
http://www.mysql.com
Support MySQL by buying support/licenses at http://shop.mysql.com
[root@localhost var]# mysql -u root
ERROR 2002 (HY000): Can't connect to local MySQL server through socket '/tmp/mysql.sock' (61)
このエラーのときは mysqlがあがってないらしい。
8.mysqlの起動
# /usr/local/mysql/bin/mysqld_safe &
ここで 問題発生!以下のエラーで DB起動せず。
[root@localhost var]# Starting mysqld daemon with databases from /usr/local/var
STOPPING server from pid file /usr/local/var/localhost.localdomain.pid
070506 14:21:15 mysqld ended
mysqlのエラーログを見ると、access rights( アクセス権)がないとあった。
070506 13:22:37 mysqld started
070506 13:22:38 InnoDB: Operating system error number 13 in a file operation.
InnoDB: The error means mysqld does not have the access rights to
InnoDB: the directory.
InnoDB: File name ./ibdata1
InnoDB: File operation call: ‘create’.
InnoDB: Cannot continue operation.
070506 13:22:38 mysqld ended
エラーに出ている、ディレクトリのオーナー、パーミッションを確認すると、
rootになっていたので、mysqlに変更し、ほか パーみションを調整。
再度
[root@localhost var]# /usr/local/bin/mysqld_safe &
[1] 15343
[root@localhost var]# Starting mysqld daemon with databases from /usr/local/var
9,mysql -u rootで DBにアクセス
[root@localhost /root]#
[root@localhost /root]# mysql -u root
Welcome to the MySQL monitor. Commands end with ; or \g.
Your MySQL connection id is 1
Server version: 5.0.37 Source distribution
Type ‘help;’ or ‘\h’ for help. Type ‘\c’ to clear the buffer.
mysql>
[root@localhost local]# mysql -V
mysql Ver 14.12 Distrib 5.0.37, for unknown-linux-gnu (sparc) using EditLine wrapper
[root@localhost local]#